Welcome to Bob & Eileen's web site. Bob generally blogs here while Eileen blogs over at her site. You can see our photos from here or click the little camera in the upper right corner.

Calendar

November 2024
S M T W T F S
 12
3456789
10111213141516
17181920212223
24252627282930

August 2, 2010

Bleu Cheese Macaroni

Filed under: Cooking — Bob @ 6:09 pm

Tonight I made bleu cheese macaroni and barbecued chicken. It was a special request from Eileen. The original recipe comes from Epicurious and I generally followed it pretty closely.

It turned out delicious and I’d highly recommend it.

July 30, 2010

iPhone 4!

Filed under: Commentary — Bob @ 4:06 pm

The iPhone 4 arrived today in Canada. There has been amazing demand, with lots of long lineups and many, many disappointed people. I was convinced I wanted one but wasn’t sure I would actually get one today, given the expectation of limited supply and high demand. I wasn’t really prepared to line up at 3am either.

I did get up and go stand in line at the local Fido store at 8am (they open at 10). The first guy in line was there at 2am, the next fellow arrived at 5:30. The two other people in front of me arrived between 6:30 and 7am. I was fifth in line, and more people started arriving rapidly. By 8:30 there was ten people waiting. The “rumors” said this particular store would have as many as fifteen phones for sale but only three 32gb models. A quick poll revealed that of the four people in front of me only two were buying the 32gb model so I was likely to get one if I wanted one (I did, I was replacing a 32gb 3GS and didn’t want to downgrade).

Nothing like hanging around with a bunch of other fanboys for a few hours debating the positives and negatives of Apple, OS X, MacBooks, and of course the different iPhone models! It was pretty easy to pass the time.

By 9:30 the staff arrived and started to prep the store. Nice people, but you could tell they had a long day in front of them. Fortunately they had a great attitude about it and we had lots of fun chatting them up. Those of us standing in line started getting antsy though, and at least another ten people had arrived looking to buy the iPhone. Other people in the mall gawked at us a bit wondering why were were silly enough to be at the mall well before it opened. Precisely at 10 the first sale began, but of course it takes FOREVER to process these purchases. I didn’t get mine until after 11am then had to wait for activation later this afternoon.

I bet there were at least 10 people turned away while I was there and I bet even more were turned down today. The local news said every place was sold out almost immediately this morning. Once again, Apple will get to publish stats about completely selling out in a matter of hours.

I’ve been playing with it for a few hours now and really love it. Well worth the money and time spent.

July 11, 2010

Weekend Away

Filed under: Food & Wine,Holidays — Bob @ 4:00 pm

We went away this past weekend for a four day mini-vacation up the coast to Gibsons on the Sunshine Coast. We stayed at a great little B&B called Marian’s on the Coast. Its in a wonderful location and since they are “dog friendly” we took the two dogs Bailey and Cairo with us.
The B&B has a nicely equipped kitchen so we made our own meals most of the time. I made ham and cheese omelettes each morning and we grilled out for lunch. Dinner was usually fruit, cheese, and wine (or port – we had a nice Smith Woodhouse LBV with us).

We did have lunch in town once, at the Sweet Water Bistro (Urbanspoon link). We stopped in Mike’s Gelato as well, for a refreshing treat while poking around town. We didn’t get to Smitty’s but was recommended; next time we’ll go there for oysters for sure.

Gibsons is about 40 minutes by ferry, and the B&B is another ten minute drive. Highly recommended if you are visiting that area.

I uploaded some photos here, enjoy!

July 4, 2010

Wheels go round and round

Filed under: Machining,Robots — Bob @ 8:02 pm

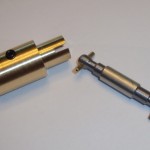
Today marked quite the milestone for my Outdoor Robot project. The last remaining mechanical parts to make for the drive train functional are complete! In the picture here you can see the brass coupler and a steel drive shaft. The gearbox from the RC truck was originally set up to use a “dogbone” drive shaft – a linkage that allows rotation plus slight shifts up and down without stressing the shaft itself. A real “dogbone” shaft has a ball on each end with a pin to fit into the groove of the receptacle socket. Mine were made on my lathe and aren’t quite as nice, but still functional.

The drive shaft is made from 1/4″ steel rod turned down at each end using my Sherline lathe. This was the first time I turned steel on it, and it was surprisingly easy to work with. So far I’d say brass and steel are better materials to work with than aluminum (at least on the lathe). I turned each end down to 0.2″ then proceeded to cut the end to be somewhat ball-shaped. I only needed a couple of these so eyeballing it worked really well. The pin is some brass rod I had, super-glued into place. I liked the idea of using a softer material so it can shear away if necessary to prevent motor or gearbox damage in case of excessive force.

The coupler has a socket at one end (to accept my faux-dogbone drive shaft) and a 6mm hole with set screw to attach to the motor shaft. I turned some brass stock down to 0.6″ then drilled out the center for the motor shaft. Mounting it on my mill gave me a good setup to drill the hole for the set screw and mill out the groove on the socket. A tapped hole in the side for a 8-32 set screw completes the job. Depending on how well this holds up I may end up making a new version out of steel.

Here is another picture of the coupler and drive shaft, showing how the two parts fit together. The last picture shows the parts mounted on the robot itself. This now means the mechanical part of the drive train is complete, and (with some batteries and electronics) the robot will soon be rolling around my yard.

July 1, 2010

More progress on the Outdoor Robot

Filed under: Machining,Robots — Bob @ 4:00 pm

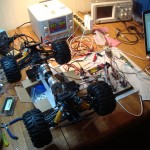
I’ve made a number of additions to my Outdoor Robot project, including motor mounts and getting the steering set up.

The motor mounts are milled from half-inch aluminum plate, holding two GHM-04 motors plus shaft encoders from Lynxmotion. These motors should be plenty powerful enough and also have a good top speed for this application. It took me a few hours to mill out the two mounts using my CNC Sherline. I need to make some couplings and drive shafts to get the motors connected to the rest of the drive train.

The steering mechanism is from the original RC truck chassis, I just needed to do something about controlling the servos. I set up an ATMega88 that sends the necessary pulse train for servo control. Eventually this chip will communicate with the Overo over CAN, also talk to the the motor controller board I purchased from Pololu, and will have a custom circuit board. For today its only task is to control the steering servos, accepting keyboard input from a serial console.

I needed to calibrate the servo pulse train to the desired positions of the steering mechanism as its installed. Normally servos are a wide range of motion (most go 180 degrees) and accept a pulse train with widths between 1ms and 2ms. These servos do that just fine, except there was no way to know where “center” was in relationship to the wheels. I also wanted to make sure I was getting approximately the same angle on the front and back steering. I created a little jig using some right-angle machinist squares plus clamps plus a ruler. Finding the center position was easy, then I mapped out the servo position required to move the wheel indicator in half-centimeter increments. I ended up with a table of 25 different entries for the front and the back steering servos that give me consistent control. Given the slop in the steering mechanism from this truck chassis, I figured this was good enough.

Here is a little movie of the steering in action. I set up the camera on a tripod then was pressing keys on my laptop that instructed the microprocessor to move the servos to particular locations. I have fully independent control over the front and back steering, and it really looks awesome.

You might also notice in the top right corner of that picture my new Rigol 50Mhz dual channel oscilloscope. Its a nifty piece of equipment, lets me look at signals like the servo pulse train easily. I picked it up from eBay for a reasonable price and so far (having only used it for a day) am very pleased. I recently also bought a Saleae Logic analyzer that I’ve been pretty happy with. I’ve been using it with the “early preview” version of the Mac software. It has bugs but so far none have prevented me from getting the job done. I’d recommend both pieces of test equipment for your own bench.

« Previous PageNext Page »
Powered by: WordPress